The holiday season is now in full swing which means it’s time to buckle down…
Homebrewing 101: The Four Basic Ingredients of Beer
The Four Basic Ingredients in Beer
This blog will take a closer look at each of the four main ingredients in beer: malted grains, water, hops, and yeast. Each of these four ingredients plays an important role in beer and can greatly affect the final outcome of a batch. As a homebrewer, the better you understand the science behind each ingredient, the better you will be able to make informed decisions when tweaking or troubleshooting a recipe.
What Are Malted Grains? What Role Do They Play in Beer?
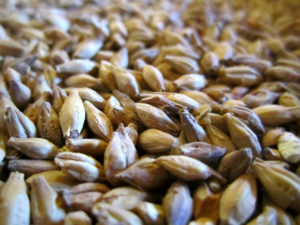
Malted grains are the building blocks from which beer is made. Malted grains are to beer what grapes are to wine or apples are to cider. Malted grains provide the sugars (mainly maltose) that fuel yeast during fermentation. Malted grains can affect the flavor, aroma, and body of beer.
There is a lot of science behind the malting process during which grains are dried and heated in such a way as to make key starches and sugars more readily available for brewing. If you’d like to dive into the biological minutiae of the malting process, this guide will be able to fill in the details. During the malting process, grains can be modified to accentuate certain characteristics for use in particular types of beer. You can find a further breakdown of popular malts here.
After malting, grains are then crushed or milled before they’re ready for brewing. If you’re purchasing grains for your homebrews, you should request that they be crushed or milled prior to shipment (unless you have the capabilities to do this yourself).
Base Malts vs. Specialty Malts
Malted grains are typically broken up into two main categories: base malts and speciality malts. Base malts are thus named because their high sugar potential makes them ideal for providing the majority of the fermentable sugars in beer. Barley is the most popular base malt. While their high sugar potential make base malts a popular option, they do have a downside. Base malts tend to have a boring flavor note.
On the other hand, specialty malts feature much more flavorful notes but lack the robust sugar potential of base malts. Specialty malts tend to be used in conjunction with base malts and have a larger impact on beer’s final color. Typically, the darker a beer’s color, the more specialty malts were used.
Mashing
While technically malting is the first step in the brewing process, the vast majority of homebrewers won’t malt their own grains. After malting comes mashing.
Mashing is the process of soaking malted grains in hot water which provides the right conditions for their enzymes to convert starches into fermentable sugars. All Synergy Brewing Systems come with a mash tun designed for the mashing process.
Extract vs. All-Grain Brewing
If you’re a new homebrewer, you should stick to using malt extract for your first few homebrews, at least until you get the hang of it. Malt extract is made from malted grains that have already been mashed, so you don’t have to perform that step yourself.
If you are purchasing malted grains yourself (all-grain brewing), you’ll need to go through the mashing process.
Water and Your Beer
Before we get into the finer details about water used in brewing, let’s take a second to talk about extract vs. whole grain brewing. A lot of what follows in this post is really only important for all grain brewers. Since extract brewers are using dehydrated wort that has already gone through the mashing process, added water plays a diminished role. As a general rule of thumb, if your water tastes good to drink, it should be fine to make good beer through extract brewing.
For all grain brewing, the most important factors you want to know about your water are its pH balance, hardness, and alkalinity.
pH
pH measures the acidity of water and is rated on a scale from 0 to 14. 7 is considered neutral. Any pH over 7 is basic or alkaline and any pH under 7 is acidic. The pH of your water/mash/beer will affect fermentability, enzymatic activity during the mash, and the taste of the final product. Beer should be acidic and have a pH somewhere between 4.2-4.4. If it gets much higher than that, the beer will become harsher and not taste as crisp and fresh. If beer’s pH is much lower, it can introduce tart flavors.
It is a common misconception that you need to be concerned about the pH of your water before starting to brew. It is much more important to make sure your mash and final product have the correct pH. You want your mash to achieve a pH balance between 5.1 and 5.8 (ideally between 5.2-5.5).
Most tap water in the United States is slightly alkaline. Malted grains tend to be acidic with specialty malts being more acidic than base malts. This means that the grain bill can have a large impact on the pH of the mash. Rather than fret about how alkaline your water is, you should aim to pair your water’s alkalinity with a grain bill that will achieve the correct mash pH.
You can buy pH test strips online to use while brewing. Make sure to purchase strips that are sensitive enough to accurately show that you have hit the 5.1-5.8 range.
The main goal is to hit the right pH during the mash, but before we talk about how you can make sure to hit that target pH, let’s talk about hardness and alkalinity.
Hardness and Alkalinity
Hardness indicates how much calcium and magnesium ions are found in water. Most water in the U.S. is at least moderately hard, but that is just fine as calcium is key for brewing. Except for some extreme cases, you probably won’t need to worry about water hardness.
Alkalinity measures how resistant water will be to a change in pH.If your water is high in alkalinity, you will have to make certain adjustments to account for it. For example, if you’re brewing a light beer like a pilsner that uses almost entirely base malts, you’ll probably need to make use of lactic acid as base malts probably won’t be acidic enough to achieve the correct mash pH. Water with moderate to high alkalinity suits itself well to darker beers that require more specialty malts. That’s because darker grains tend to be more acidic which will help to hit the target range.
A lot of this will be highly dependant on the specificities of your water and the recipe you use. Some level of trial and error will be necessary to figure it out.
For a greater, more in-depth look at water, minerals, alkalinity, and pH, make sure to check out this article.
To help find a water report for where you live, check out the EPA’s database.
What Are Hops? How Do They Impact Brewing?
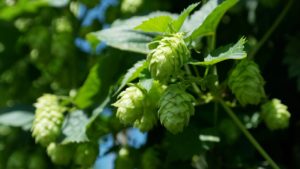
Next, let’s take a closer look at hops.
The flower, or cone, on female Humulus lupulus plants are what we commonly refer to as hops. The cones are filled with perishable resins, and these resins are what give hops the characteristics that makes them favorable for brewing beer.
In today’s beer, hops are used for their bitterness which makes them ideal for counterbalancing the sweetness of introduced by malts. Hops can also be used to add flavors and aromas to beer as well as work as a preservative.
The resins in hops are naturally non-bitter and insoluble. When hops are added to the boil, these resins undergo a process known as isomerization which is a chemical change that transforms them to be both bitter and soluble. The longer hops are in the boil, the more isomerization that occurs, therefore leading to a more bitter final product.
The History of Hops and Beer
While hops are now considered one of the four main ingredients in beer, people made beer for thousands of years completely without hops. A mixture of herbs and spices called gruit was traditionally used to flavor beer. Starting in the 16th Century, hops started to become more and more popular in beers throughout Western Europe and Great Britain.
One of the original appeals of adding hops to beer is that it worked as a preservative. You may already know that India Pale Ales got their name because they were often brought along the months-long journey from Europe to India. These ales were stored in barrels with hops to make sure the beer wouldn’t spoil throughout the course of voyages.
It wasn’t really until American microbrewers fell in love with hops that hops started taking a primary role in the beer brewing process rather than a supporting one.
Different Uses for Hops
The amount of bitterness, flavor, and aroma that hops add to beer is highly dependant on how a brewer uses them. In addition to adding hops at various stages of the boil, they can also be added near the end of fermentation.
Bittering
To get the best bittering effects from hops, they should be immersed in the boil for about an hour (45 minutes minimum, 90 minutes max). As mentioned above, the longer the resins in hops are exposed to heat, the more isomerization occurs leading to more bitterness being extracted from them.
Flavoring
Hops added for the final 20-40 minutes of the boil are typically for flavoring purposes. This amount of time allows isomerization to occur but keeps the beer from becoming as bitter. Flavoring hops are useful for adding some bitterness in addition to hop flavors to beer.
Finishing
When hops are added to the boil for 15 minutes or less, they are known as finishing or aromatic hops. This short period of time in the boil effectively limits the amount of bitterness and flavors that are passed on while aromatic oils that tend to boil out during longer immersion times remain leaving a hoppy aroma.
Dry Hopping
Dry hopping is the technique of adding hops to the fermentation vessel after fermentation has completed. Because there is no heat source, isomerization doesn’t occur, and the hops don’t add bitterness or any lasting flavor. However, dry hopping is a useful tool for adding a strong aroma to beer.
Last, but Not Least: Yeast!
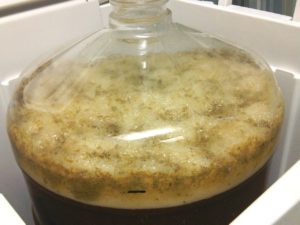
The last of the four main ingredients in beer transforms sugar-rich wort into beer. Of course, I’m talking about yeast. Yeast are single-celled microorganisms which feed of the sugars present in wort. As the yeast feeds, it expels alcohol and carbon dioxide (CO2) and self-replicates in the process. There are two main types of yeast typically used by homebrewers: ale yeast and lager yeast.
Ale Yeast
As you probably guessed, ale yeasts are the strains of yeast which are most conducive to fermenting ales. These strains of yeast work best when kept in warm temperatures (typically between 55 to 70 degrees Fahrenheit). Most ale yeast strains are known as top fermenting yeast because the high level of activity causes the yeast to rise to the top of the fermenting vessel. Ale yeasts are used to brew ales, stouts, porters, and wheat beers, among others.
Lager Yeast
Lager yeasts are the yeast strains best used for brewing lagers such as pilsners, dortmunders, and bocks. These strains of yeast work best at lower temperatures (between 45 and 60 degrees Fahrenheit). Because of these lower temperatures, there is less yeast activity which means fermentation takes longer to complete. As a result, lager yeast clumps together and settles at the bottom of the fermentation vessel as fermentation finishes. This is why lager yeast is also known as bottom fermenting yeast.
Due to the lower required temperatures and the additional amount of time required, lager fermentation can be much trickier than ale fermentation. One trick is to make use of a yeast starter. Check out our blog post about the basics of making your own yeast starter.
Dry vs. Liquid Yeast
Yeast used for fermenting homebrews comes in two different forms: dry and liquid. Dry yeast consists of cells which have been dehydrated to keep them viable and stable for longer periods of time and is commonly used by beginner homebrewers. Because only a select few strains are capable of undergoing this process, there are fewer strains of dry yeast available for homebrewing than there are liquid strains. However, dry yeast packets tend to have a lot more viable yeast cells than the typical vial or smack pack of liquid yeast.
Liquid yeast typically comes in a vial or a “smack pack” and typically has fewer viable yeast cells than a comparable packet of dry yeast. As a result, it’s often a good idea to use a yeast starter to increase the yeast cell count prior to pitching.
Other Key Yeast Terms
Attenuation: the percentage of malt sugar that the yeast strain converts to ethanol and CO2. Attenuation is typically between 65-80%
Apparent Attenuation: attenuation as measured by comparing the original and final gravities of the beer. This is determined by the formula: Apparent Attenuation = (OG – FG) / OG. For example, if a beer had a 1.040 OG and a 1.010 FG, its apparent attenuation would be 75%.
Flocculation: As wort is fermented into beer, yeast cells may begin to clump together. Flocculation describes how quickly and how well yeast clumps together near the end of fermentation.
Lagtime: after yeast is pitched, it takes time for the cells to acclimate to their new environment and begin converting sugars into alcohol. The amount of time this takes is referred to as lagtime. Lagtime is typically between 3 to 15 hours. Lagtimes longer than 24 hours indicate that not enough yeast was pitched, the wort was poorly aerated, the yeast pitched was in poor condition, or some combination of the three.
Now that you have an understanding of the basic ingredient composition of all beers, it’s time to get brewing! Check out our amazing homebrew systems as well as our great homebrewing equipment.
Related Posts